I have been working on a pet project recently and decided to test a framework I heard a lot about, but have not yet tested myself — FastAPI. At first it was a small project with several endpoints and a React Frontend, but then I felt it was the right thing for it to get real badass architecture. So, it was time to split it into micro-services.
And of course one of the main issues to solve was answering the question — “how do I want them to communicate?” For various reasons I chose to use RabbitMQ as an event and message broker. Since my micro-services were quite active I needed them both to consume and produce messages. And here came the tricky part. I have looked through the documentation in FastAPI and RabbitMQ, did my best to implement the RPC as it was put in the docs, but it still did not work. Finally, I managed to have it working both ways, for publishing and consuming in a single FastAPI app. Since I did not manage to find a full working solution in the internet, I decided it was worthwhile sharing my experience with you. I will skip some part, like installing python, venv and RabbitMQ, setting up loggers, to keep it short and to the point.
First of all need to set up a Pika client, which will handle all the communication with RabbitMQ:
pika_client.py
class PikaClient:

    def __init__(self, process_callable):
        self.publish_queue_name = env('PUBLISH_QUEUE', 'foo_publish_queue')
        self.connection = pika.BlockingConnection(
            pika.ConnectionParameters(host=env('RABBIT_HOST', '127.0.0.1'))
        )
        self.channel = self.connection.channel()
        self.publish_queue = self.channel.queue_declare(queue=self.publish_queue_name)
        self.callback_queue = self.publish_queue.method.queue
        self.response = None
        self.process_callable = process_callable
        logger.info('Pika connection initialized')
Most important here are:
- process_callable — a callable callback which will handle the actual business logic to process the incoming message;
- PUBLISH_QUEUE — a name for a queue, where we shall send our outgoing messages.
Then we need to add a method to set up a consumer for incoming messages. Here is how it shall look like:
pika_client.py (continued)
async def consume(self, loop):
    """Setup message listener with the current running loop"""
    connection = await connect_robust(host=env('RABBIT_HOST', '127.0.0.1'),
                                      port=5672,
                                      loop=loop)
    channel = await connection.channel()
    queue = await channel.declare_queue(env('CONSUME_QUEUE', 'foo_consume_queue'))
    await queue.consume(self.process_incoming_message, no_ack=False)
    logger.info('Established pika async listener')
    return connection
Things to take a note in here:
- CONSUME_QUEUE — name of the queue, from which we shall get the incoming messages;
- I decided to setup a consumer with acknowledge of receipt.
Next, we add another important method to handle incoming message:
pika_client.py (continued)
async def process_incoming_message(self, message):
    """Processing incoming message from RabbitMQ"""
    message.ack()
    body = message.body
    logger.info('Received message')
    if body:
        self.process_callable(json.loads(body))
Actually, there is nothing very special in here.
And, of course there should be a sending method. I decided to use a simple pika connection in here, to show that use of synchronous client is possible as well. Feel free to reuse the connection from consumption method.
pika_client.py (continued)
def send_message(self, message: dict):
    """Method to publish message to RabbitMQ"""
    self.channel.basic_publish(
        exchange='',
        routing_key=self.publish_queue_name,
        properties=pika.BasicProperties(
            reply_to=self.callback_queue,
            correlation_id=str(uuid.uuid4())
        ),
        body=json.dumps(message)
    )
Ok, now it’s time to set up our app. First of all we create a class for our app and add a method which logs the incoming message to our stdout. Take a note, that we initialize an instance of the PikaClient class created above.
test_app.py
class FooApp(FastAPI):

    def __init__(self, *args, **kwargs):
        super().__init__(*args, **kwargs)
        self.pika_client = PikaClient(self.log_incoming_message)

    @classmethod
    def log_incoming_message(cls, message: dict):
        """Method to do something meaningful with the incoming message"""
        logger.info('Here we got incoming message %s', message)
And now comes the most important part, we set up the app and create the startup event handler, which actually does the message listening magic under the hood. We get the current running loop and create and await the consumption task.
test_app.py (continued)
foo_app = FooApp()
foo_app.include_router(router)


@foo_app.on_event('startup')
async def startup():
    loop = asyncio.get_running_loop()
    task = loop.create_task(foo_app.pika_client.consume(loop))
    await task
And that’s it. All we have left so far was the router and payload parser schema to handle API call, which we shall use to test our app.
router.py
router = APIRouter(
    tags=['items'],
    responses={404: {"description": "Page not found"}}
)


@router.post('/send-message')
async def send_message(payload: MessageSchema, request: Request):
    request.app.pika_client.send_message(
        {"message": payload.message}
    )
    return {"status": "ok"}
schema.py
from pydantic import BaseModel


class MessageSchema(BaseModel):
    message: str
And a request.http file to test our API. I use Pycharm, so here is the file content, if you use Postman, it’s ok as well.
POST http://127.0.0.1:8001/send-message
Accept: application/json

{
"message": "I test sending messages"
}
All we have to do is stat rabbitmq and our app. I used uvicorn, so the start command is as follows (sets up the api client on port 8001, with autoreload feature from src folder, in case you change something on the fly):
test_app:foo_app — reload — reload-dir .src/ — port 8001
After I launch the client I see the following in my stdout:

First, we see the message with connection established in Pika init call, then from the startup event of the app itself.
If we call our POST http://127.0.0.1:8001/send-message and take a look at RabbitMQ admin panel we shall see:

2 new queues were created for us. One message was published.

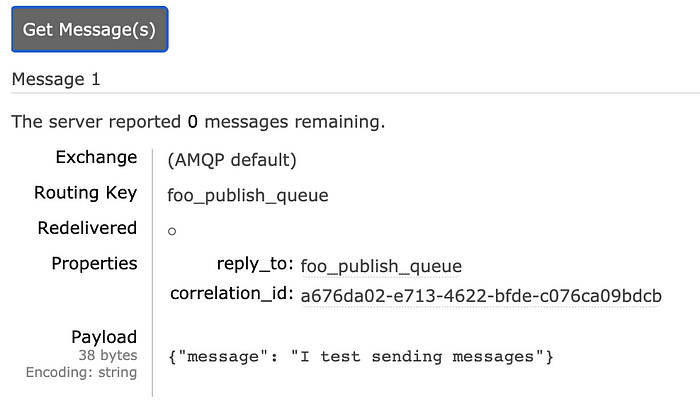
And if we try to get the message, we shall see the actual message {“I test sending messages”}. So, our API call worked.

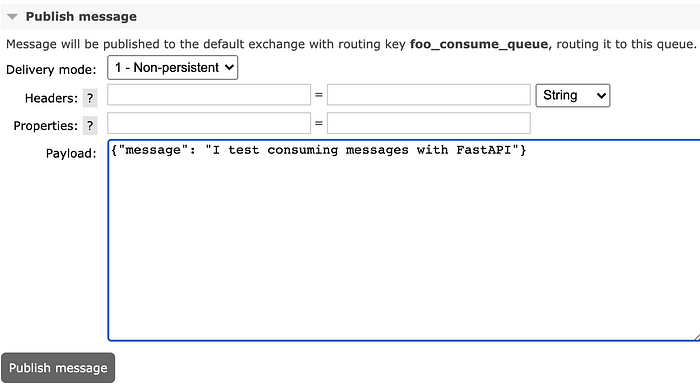
Now, if we publish another message to the foo_consume_queue

We can see that it was received and logged by our callback function

Now you know how to setup a working FastAPI client with RabbitMQ consumer and listener in a single app.